March 14, 2010
Annotate Screenshots Natively in Mac OS X
Screenshots can be handy things. Before I made the switch to Mac I used to use Greenshot or Fireshot. But in Mac OS X its as easy as ⌘⇧4. However, sometimes a screenshot isn’t enough and you need a clarifying arrow or label to really convey your message. There are some 3rd party applications that can help, but you can do it quickly, simply, and for free using Preview.
- Take your screenshot. ⌘⇧4 will capture a region, if you press the spacebar it will toggle to capture a chosen window instead. If you want the whole screen its ⌘⇧3. For a timed screenshot (to capture something that requires the mouse) use Grab.
- Open the screenshot (it will be on your desktop as a .png file) with Preview.
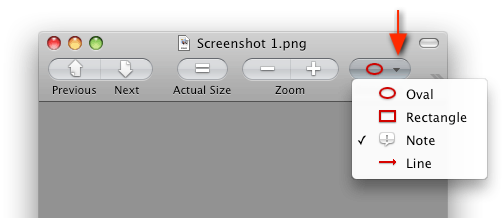
- Click the Annotation button in the toolbar. You can choose from circle, rectangle, arrow, and text. Add them in, resize and move as needed.In Snow Leopard go to Tools > Annotate or press ⌘⇧A
It works great and is very quick. My only beef is that the default text is huge and centered, but you can reformat it by pressing ⌘T (Tools > Show Fonts).
Comments
Add a comment
Comments are closed on this entry.